Clik here to view.
Learn how to control the UI with this OS X View Controllers Tutorial!
When writing any code, it’s important to get clear separation of concerns — functionality should be split out into appropriate smaller classes. This helps keep code maintainable and easy to understand. Apple has designed the frameworks available on OS X around the Model-View-Controller design pattern, and as such has provided various controller objects that are responsible for managing the UI.
View controllers are responsible for hooking up the model layer to the view layer, and have an incredibly important role in the architecture of your OS X app.
In this OS X view controllers tutorial you’ll discover the wide range of functionality that is baked into vanilla view controllers, along with learning how you can create your own view controller subclasses to build up your app in an easy-to-understand manner. You’ll see how the life cycle methods allow you to hook into important events for the UI of your app, together with how view controllers compare with window controllers.
To follow this tutorial you’ll need the most recent version of OS X and Xcode installed on your mac. There’s no starter project — you’ll build a great app from scratch! You might like to read Gabriel Miro’s excellent tutorial on windows and window controllers before embarking upon this view controllers tutorial, but it’s not a requirement.
Enough introduction — let’s kick off with some theory!
Introducing View Controllers
A view controller is responsible for managing a view and its subviews. In OS X, view controllers are implemented as subclasses of NSViewController.
View controllers have been around for a while (Apple introduced them with OS X 10.5), but before OS X 10.10 they weren’t part of the responder chain. That means, for example, that if you had a button on a view controller’s view, the controller would not receive its events. After OS X 10.10, however, view controllers became very useful as building blocks for more complex user interfaces.
View controllers allow you to split the content of your window into logical units. The view controllers take care of those smaller units, while the window controller handles window-specific tasks like resizing or closing the window. This makes your code way easier to organize.
Another benefit is that view controllers are easy to reuse in other applications. If a File Browser with a hierarchical view on the left is controlled by a single view controller, you can use it in another application that needs a similar view. That’s time and energy saved, which you can now devote to drinking beer!
Window Controller or View Controller?
You may be wondering when to use only a window controller, and when to implement view controllers.
Prior to OS X 10.10 Yosemite, NSViewController was not a very useful class. It did not provide any of the view controller functionality you could expect — for instance, that found in UIViewController.
With the changes introduced since, like the view life cycle and the inclusion of the view controllers in the responder chain to receive events from its view, Apple is promoting the Model View Controller (MVC) pattern in the same way it’s currently doing with iOS Development. You should use view controllers to handle all the functionality of your views and subviews and the user interaction. Use window controllers to implement the functionality associated to the application windows, like setting up the root view controller, resizing, repositioning, setting the title, etc.
This approach will help in building a complex user interface by dividing the different parts of the UI into several view controllers and using them like building blocks to form the complete user interface.
View Controllers in Action
In this tutorial, you’ll write an application called RWStore that lets you select different books from raywenderlich.com store. Let’s get started!
Open Xcode and choose to create a new Xcode project, and select OS X \ Application \ Cocoa Application from the templates menu. Click Next.
Image may be NSFW.
Clik here to view.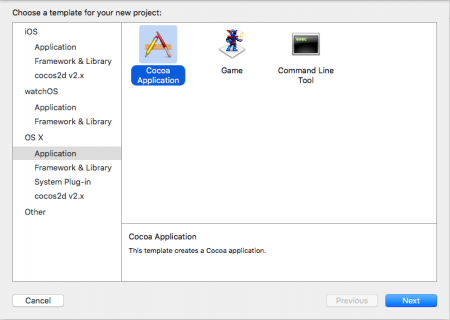
Name your project RWStore. On the options screen, make sure that Swift is selected as Language and the Use Storyboards checkbox is checked. You don’t need Unit and UI Tests, so uncheck the corresponding checkboxes. Click Next and save your project.
Image may be NSFW.
Clik here to view.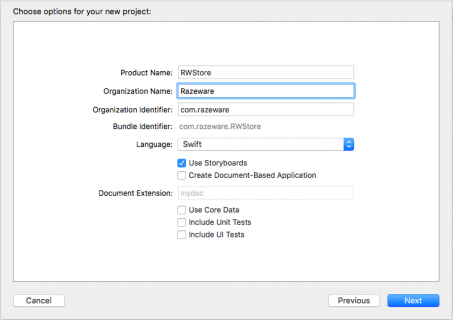
Download the project resources. The zip file contains images for the books and a Products.plist file containing an array of dictionaries with the information for a product, like the name, description, and price. You will also find a source code file named Product.swift. This file contains the Product class, that reads the product information from the plist file. You’re going to add these to RWStore.
Select the Assets.xcassets folder in the Project Navigator and drop the downloaded images into the column containing the app icon.
Image may be NSFW.
Clik here to view.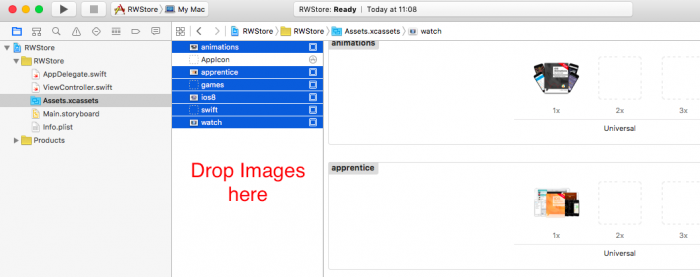
Drag and drop Products.plist and Product.swift into the Project Navigator on the left. Make sure that Copy items if needed is checked.
Image may be NSFW.
Clik here to view.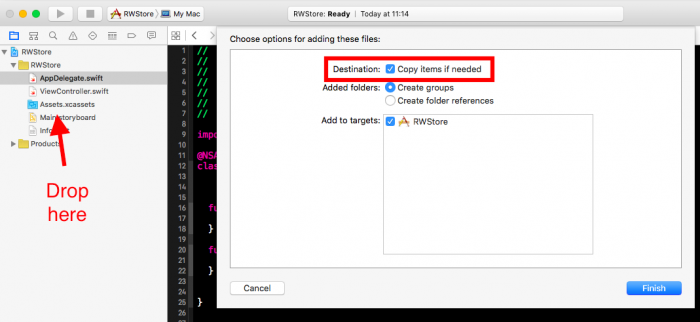
Build and run the app. You should see the main window of your application.
Image may be NSFW.
Clik here to view.
It’s empty now, but don’t worry — this is just the starting point.
Creating the User Interface
Open Main.storyboard, select View Controller Scene, and drag a pop-up button into the view. You’ll use this pop-up button to display the list of products.
Image may be NSFW.
Clik here to view.
Set its position using auto layout. The pop-up button should occupy the full width of the view and stay pinned to the top, so select the pop-up button and click the Pin button located in the bottom bar.
In the pop-up that appears, select the trailing constraint and set its value to Use Standard Value. Repeat for the top and leading constraints.
Image may be NSFW.
Clik here to view.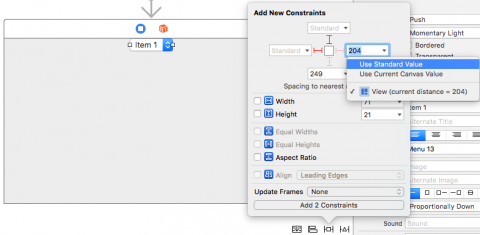
To complete the UI, add a view to show the product details. Select a container view and drag it below the pop-up button.
Image may be NSFW.
Clik here to view.
A container view is a placeholder for another view that is not available in Interface Builder or is provided by another View Controller.
Now we’ll set up the auto layout constraints for this view. Select the container view and click on the Pin button. Add top, bottom, trailing, and leading constraints with a value of 0. Click the Add 4 constraints button.
Image may be NSFW.
Clik here to view.
Select the view of your view controller and click the Resolve Auto Layout Issues button to the right of the Pin button. Select All Views in Controller/Update Frames. Your view should look like this:
Image may be NSFW.
Clik here to view.
Now you’ll create an action that will be called when the button selection changes. Open the Assistant Editor (you can also use the keyboard shortcut [alt] + [cmd] + [Enter]) and make sure that ViewController.swift is open. Control-drag from the pop-up button into ViewController.swift and add an Action Connection. In the pop-up view, make sure the connection is an Action, the name is valueChanged, and the type is NSPopUpButton.
Image may be NSFW.
Clik here to view.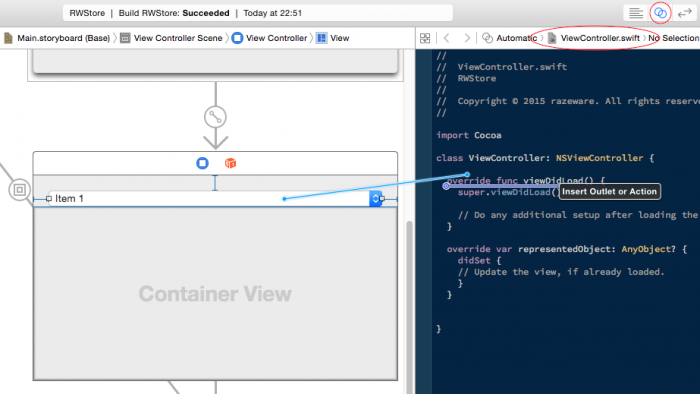
Image may be NSFW.
Clik here to view.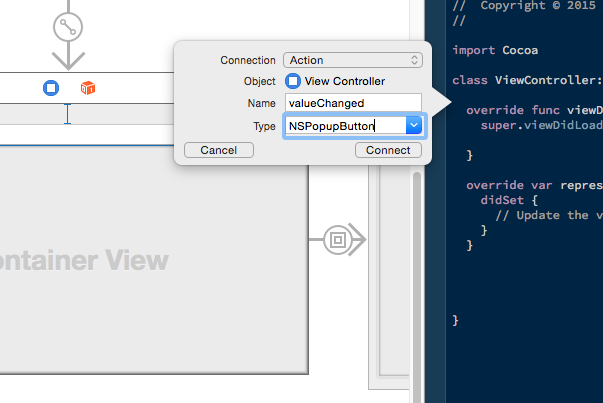
On the canvas, the view controller is connected to the container view with an embed segue. Your app will use a custom view controller, so you can delete the auto-generated one: select the view controller associated with the container view and press delete.
Image may be NSFW.
Clik here to view.
Tab View Controllers
Now we’ll add the view controller used to display the product info: a Tab View Controller. A Tab View Controller is a view controller subclass (NSTabViewController); its view contains a tab view with two or more items and a container view. Behind every tab is another view controller whose content is used to fill the container view. Every time a new tab is selected, the Tab View Controller replaces the content with the view of the associated view controller.
Select a Tab View Controller and drag it on on the canvas.
Image may be NSFW.
Clik here to view.
The tab controller is now on the storyboard, but it’s not used yet. Connect it to the container view using an embed segue; control-drag from the container view to the Tab View Controller.
Image may be NSFW.
Clik here to view.
Select embed in the menu that pops up.
Image may be NSFW.
Clik here to view.
With this change, when the app runs the area of the container view is replaced with the view of the Tab View Controller. Double-click on the left tab of the Tab View and rename it Overview. Repeat to rename the right tab Details.
Image may be NSFW.
Clik here to view.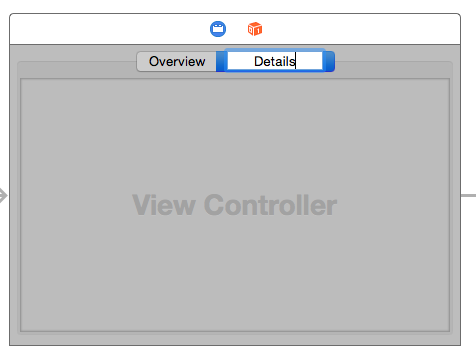
Build and run the app.
Image may be NSFW.
Clik here to view.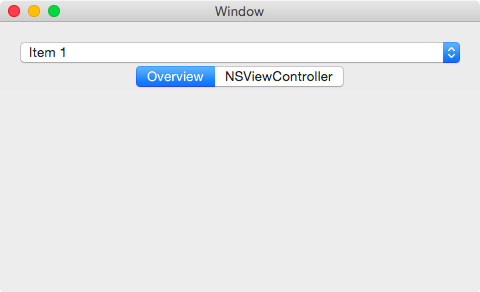
Now the tab view controller is shown, and you can select between the two view controllers using the tabs. This isn’t noticeable yet because the two views are exactly the same, but internally the tab view controller is replacing them when you select a tab.
Overview View Controller
Next up you need to create the
Go to File\New\File…, choose the OS X\Source\Cocoa Class, and click Next. Name the class OverviewController, make it a subclass of NSViewController, and make sure Also Create XIB for user interface is not selected. Click Next and save.
Image may be NSFW.
Clik here to view.
Return to Main.storyboard and select Overview Scene. Click the blue circle on the view and change the class to OverviewController in the Identity Inspector on the right.
Image may be NSFW.
Clik here to view.
Drag three labels onto the OverviewController’s view. Place the labels on the top left side of the view, one below each other. Add an image view on the top right corner of the view.
Note: By default, the image view has no borders and can be a bit difficult to find in the view. To help during the layout process, you can set an image. With the image view selected, open the Attributes Inspector and select games in the Image field. This image will be replaced in runtime with the proper product image in the tutorial code
Select the top label. In the Attributes Inspector, change the font to System Bold and the size to 19.
The view should now look like this:
Image may be NSFW.
Clik here to view.
It’s time to use the superpowers of auto layout to make this view look great.
Select the image view and click the Pin button on the bottom. Add constraints for top and trailing with the standard value, and constraints for width and height with a value of 180.
Image may be NSFW.
Clik here to view.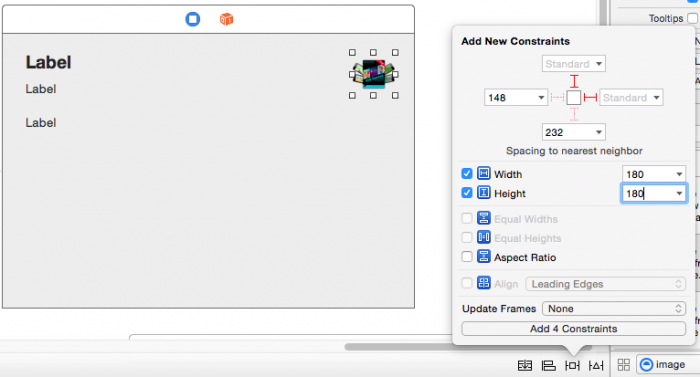
Select the top label and add bottom, top, leading, and trailing constraints using the standard value.
Image may be NSFW.
Clik here to view.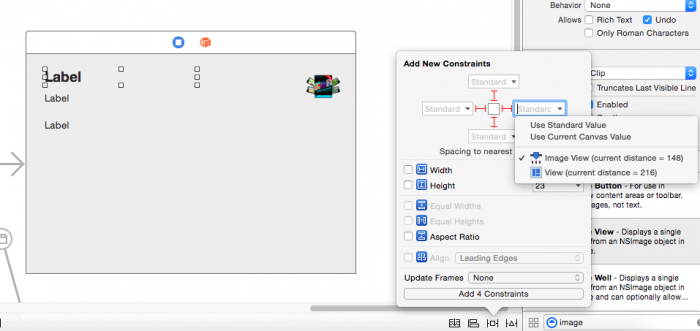
Select the label below and add constraints for trailing and leading using the standard value.
Image may be NSFW.
Clik here to view.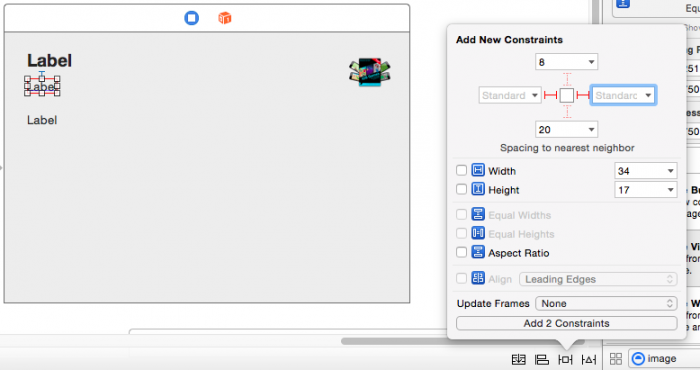
Repeat for the last label, adding constraints for leading, trailing and bottom, using the standard value. For the top constraint, make sure that the image view is selected (so that the top is aligned to the image view instead of the super view), and use the standard value.
Image may be NSFW.
Clik here to view.
Note: If you can’t see the image view in the selection menu, you may need to make the label wider, so that the end of the label is under the image view.
Click on the Resolve Auto Layout button in the bottom bar and select All Views in Controller/Update Frames. Your view should look like this:
Image may be NSFW.
Clik here to view.
After all your hard work on the interface, it’s finally time to see the result, so build and run.
Image may be NSFW.
Clik here to view.
Click on the tabs and see how the tab view controller shows the appropriate view controller. It works right out of the box and without a single line of code!
Add Some Code
It’s time to get your hands dirty adding some code to show the products details in the view. In order to refer to the labels and image view from code you need to add an IBOutlet for each of them.
First, open the Assistant Editor and make sure OverviewViewController.swift is selected. Control-drag from the top label into OverviewController.swift and add an outlet named titleLabel. Ensure the type is NSTextField.
Image may be NSFW.
Clik here to view.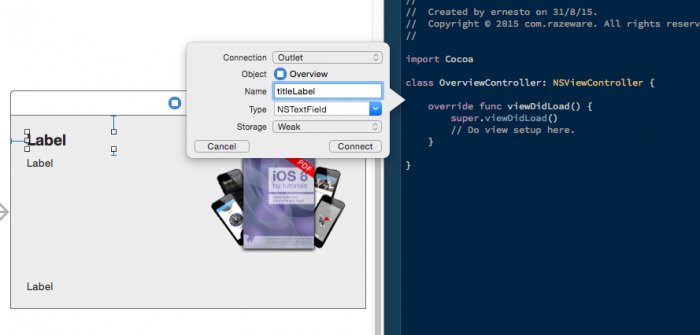
Repeat the process with the other two labels and the image view to create the rest of the outlets with the following names:
priceLabelfor the label in the middle.descriptionLabelfor the bottom label.productImageViewfor the image view.
Like most UI elements, labels and image views are built of multiple subviews, so make sure that you have the correct view selected. You can see this when you look at the class for the outlet: for the image view it must be NSImageView, not NSImageCell. For the labels, it must be NSTextField, not NSTextFieldCell.
To show the product information in the overview tab, open OverviewController.swift and add the following code inside the class implementation:
//1
let numberformatter = NSNumberFormatter()
//2
var selectedProduct: Product? {
  didSet {
    updateUI()
  }
}
Taking this code bit-by-bit:
numberformatteris anNSNumberFormatterobject used to show the value of the price, formatted as currency.selectedProductholds the currently selected product. Every time the value changes,didSetis executed, and with itupdateUI().
Now add the updateUI method to OverviewController.swift.
private func updateUI() {
  //1
  if viewLoaded {
    //2
    if let product = selectedProduct {
      productImageView.image = product.image
      titleLabel.stringValue = product.title
      priceLabel.stringValue = numberformatter.stringFromNumber(product.price)!
      descriptionLabel.stringValue = product.descriptionText
    }
  }
}
- Checks to see if the view is loaded.
viewLoadedis a property ofNSViewController, and it’s true if the view is loaded into memory. If the view is loaded, it’s safe to access all view-related properties, like the labels. - Unwraps
selectedProductto see if there is a product. After that, the labels and image are updated to show the appropriate values.
This method is already called when the product changes, but also needs to called as the view is ready to be displayed.
View Controller Life Cycle
Since view controllers are responsible for managing views, they expose methods that allow you to hook into events associated with the views. For example the point at which the views have loaded from the storyboard, or when the views are about to appear on the screen. This collection of event-based methods are known as the view controller life cycle.
The life cycle of a view controller can be divided into three major parts: its creation, its lifetime, and finally its termination. Each part has methods you can override to do additional work.
Creation
viewDidLoad()is called once the view is fully loaded and can be used to do one-time initializations like the configuration of a number formatter, register for notifications, or API calls that only need to be done once.viewWillAppear()is called every time the view is about to appear on screen. In our application, it is called every time you select the Overview tab. This is a good point to update your UI or to refresh your data model.viewDidAppear()is called after the view appears on screen. Here you can start some fancy animations.
Lifetime
Once a view controller has been created, it then enters a period during which it it handles user interactions. It has three methods specific to this phase of its life:
updateViewConstraints()is called every time the layout changes, like when the window is resized.viewWillLayout()is called before thelayout()method of a view controller’s view is called. For example, you can use this method to adjust constraints.viewDidLayout()is called afterlayout()is called.
In all three methods, you must call the super implementation at some point.
Termination
These are the counterpart methods to creation:
viewWillDisappear()is called before the view disappears. Here you can stop your fancy animations you started inviewDidAppear().viewDidDisappear()is called after the view is no longer on the screen. Here you can discard everything you no longer need. For example, you could invalidate a timer you used to upate your data model on a periodic time base.
Life cycle in practice
Now that you know the most important things about a view controller’s life cycle, it’s time for a short test!
Question: Every time OverviewController’s view appears, you want to update the UI to take into account that a user selected a product when the Details tab was selected. Which method would be a good fit?
Open OverviewController.swift and add this code inside the class implementation:
override func viewWillAppear() {
  updateUI()
}
This overrides the viewWillAppear to update the user interface before the view becomes visible.
The number formatter currently uses default values, which doesn’t fit your needs. You’ll configure it to format numbers as currency values; since you only need to do this once, a good place is the method viewDidLoad().
In OverviewController add this code inside viewDidLoad():
numberformatter.numberStyle = .CurrencyStyle
For the next step, the main view controller needs to react on product selection and then inform the OverviewController about this change. The best place for this is in the ViewController class, because this controller owns the pop-up button. Open ViewController.swift and add a these properties inside the ViewController class implementation:
private var products = [Product]()
var selectedProduct: Product!
The first property, products, is an array used to keep a reference to all the products. The second, selectedProduct, holds the product selected in the pop-up button.
Find viewDidLoad() and add the following code inside:
if let filePath = NSBundle.mainBundle().pathForResource("Products", ofType: "plist") {
  products = Product.productsList(filePath)
}
This loads the array of products from the plist file using the Product class added at the beginning of the tutorial, and keeps it in the products property. Now you can use this array to populate the pop-up button.
Open Main.storyboard, select View Controller Scene, and switch to the Assistant Editor. Make sure ViewController.swift is selected, and Control-drag from the pop-up button to ViewController.swift to create an outlet named productsButton. Make sure the type is NSPopUpButton.
Image may be NSFW.
Clik here to view.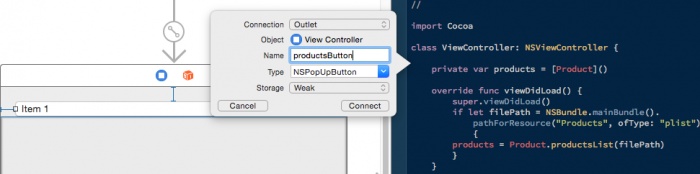
Return to ViewController.swift and add the following code to viewDidLoad() :
//1
productsButton.removeAllItems()
//2
for product in products {
  productsButton.addItemWithTitle(product.title)
}
//3
selectedProduct = products[0]
productsButton.selectItemAtIndex(0)
This piece of code does the following:
- It removes all items in the pop-up button, getting rid of the Item1 and Item2 entries.
- It adds an item for every product, showing its title.
- It selects the first product and the first item of the pop-up button. This makes sure that everything is consistent.
The final piece in this puzzle is reacting to the pop-up button selection changes. Find valueChanged(_:) and add the following lines:
if let bookTitle = sender.selectedItem?.title,
  let index = products.indexOf({$0.title == bookTitle}) {
  selectedProduct = products[index]
}
This code tries to get the selected book title and searches in the products for the index of the title. With this index, it sets selectedProduct to the correct product.
Now you only need to inform OverviewController when the selected product changes. For this you need a reference to the OverviewController. You can get a reference within code, but first you have to add another property to ViewController.swift to hold that reference. Add the following code inside the ViewController implementation:
private var overviewViewController: OverviewController!
You can get the instance of OverviewController inside prepareForSegue(_:, sender:), which is called by the system when the view controllers are embedded in the container view. Add the following method to the ViewController implementation:
override func prepareForSegue(segue: NSStoryboardSegue, sender: AnyObject?) {
  //1
  let tabViewController = segue.destinationController as! NSTabViewController
  //2
  for controller in tabViewController.childViewControllers {
    //3
    if controller is OverviewController {
      overviewViewController = controller as! OverviewController
      overviewViewController.selectedProduct = selectedProduct
    } else {
      //More later
    }
  }
}
This code does the following:
- Gets a reference to the Tab View controller.
- Iterates over all its child view controllers.
- Checks if the current child view controller is an instance of
OverviewController, and if it is, sets itsselectedProductproperty.
Now add the following line in the method valueChanged(_:), inside the if let block.
overviewViewController.selectedProduct = selectedProduct
Build and run to see how the UI updates when you select a different product.
Image may be NSFW.
Clik here to view.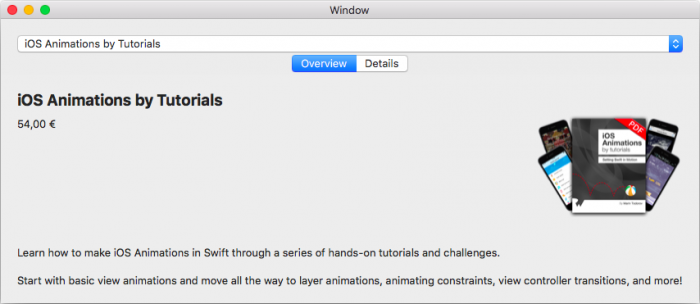
Detail View Controller
Now we’ll create a view controller class for the Details tab.
Go to File\New\File…, choose OS X\Source\Cocoa Class, and click Next. Name the class DetailViewController, make it a subclass of NSViewController, and make sure Also Create XIB for user interface is not selected. Click Next and save.
Image may be NSFW.
Clik here to view.
Open Main.storyboard and select Details Scene. In the Identity Inspector change the class to DetailViewController.
Image may be NSFW.
Clik here to view.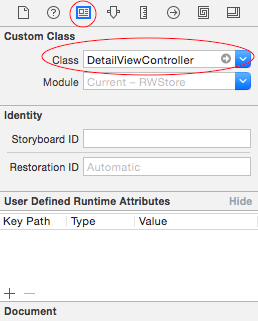
Add an image view to the detail view. Select it and click on the Pin button to create its constraints. Set width and height constraints to a value of 180, and a top constraint to the standard value.
Image may be NSFW.
Clik here to view.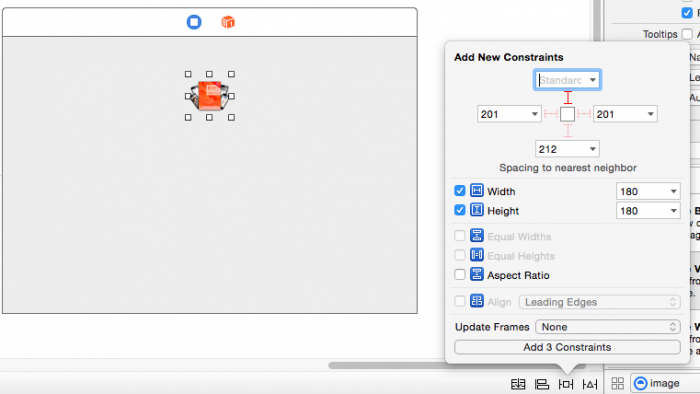
Click on the Align button in the bottom bar and add a constraint to center the view Horizontally in the Container.
Image may be NSFW.
Clik here to view.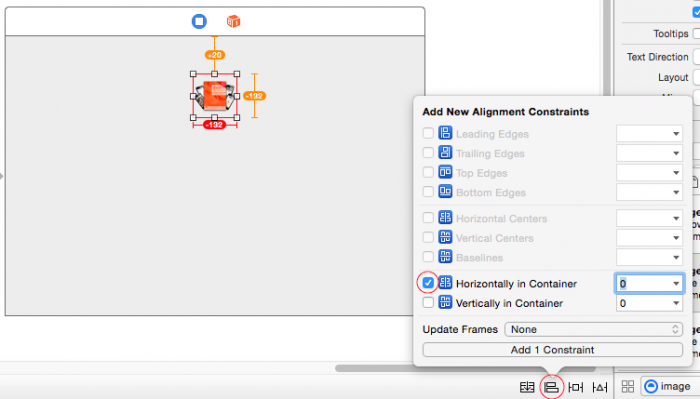
Add a label below the image view. Change the font to bold and the size to 19, then click on the Pin button to add constraints for top, leading, and trailing, using the standard values.
Image may be NSFW.
Clik here to view.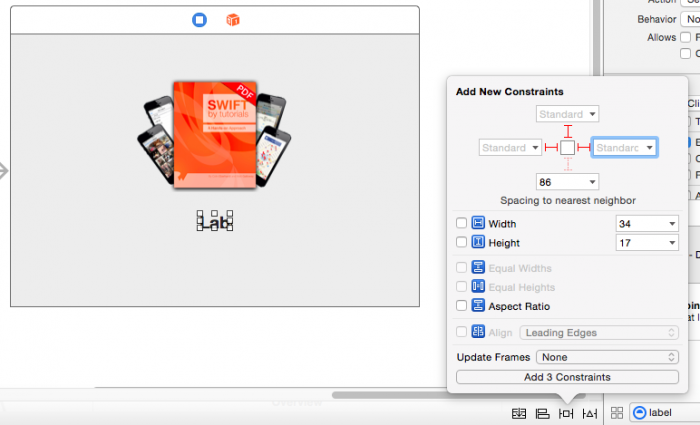
Add another label below the previous one. Select it, and click on the Pin button first to and add also constraints for top, leading and trailing, using standard values.
Image may be NSFW.
Clik here to view.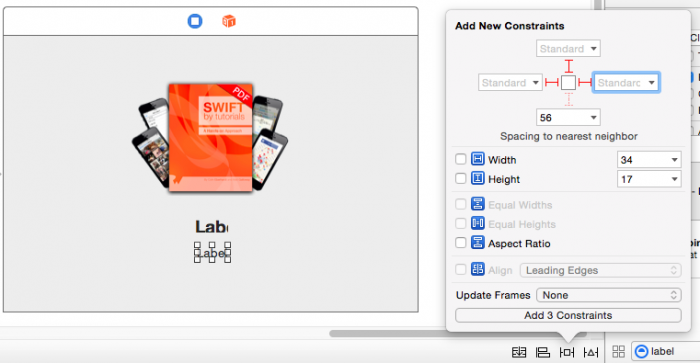
Drag an NSBox under the last label. Select it and add constraints for top, leading, trailing and bottom, using standard values.
Image may be NSFW.
Clik here to view.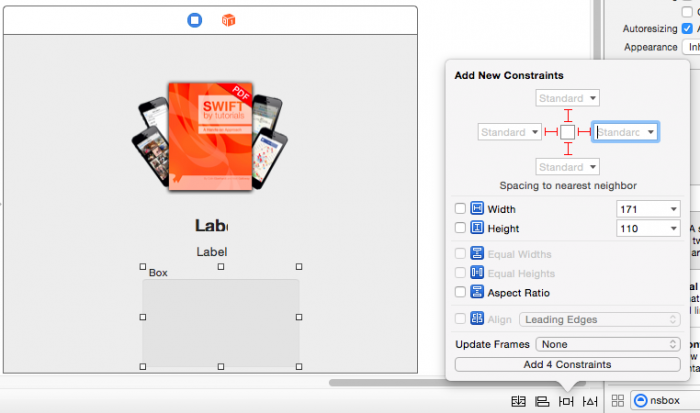
Open the Attributes Inspector and change the box font to bold and the size to 14. Change the title to “Who is this Book For?”.
Image may be NSFW.
Clik here to view.
An NSBox is a nice way to group related UI elements and to give this group a name you can see in Xcode’s Identity Inspector.
To complete the UI, drag a label inside the content area of the NSBox. Select the label and click on the Pin button to add constraints for top, leading, trailing, and bottom, all using the standard value.
Image may be NSFW.
Clik here to view.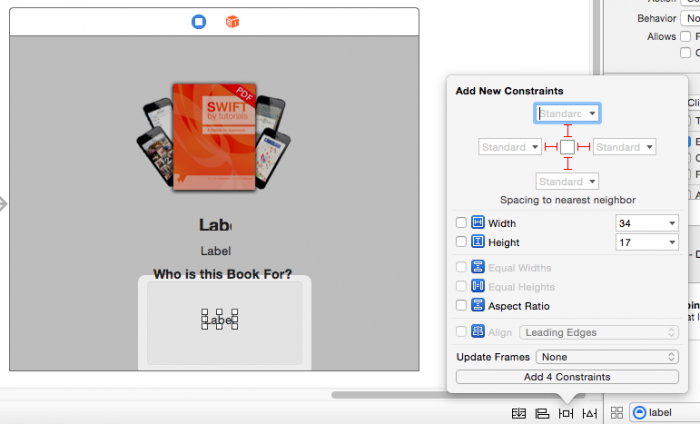
After updating the frames, the UI should look like this:
Image may be NSFW.
Clik here to view.
To create the outlets for those controls, open the Assistant Editor and make sure that DetailsViewController.swift is open. Add four IBOutlets, giving them the following names:
productImageViewfor the NSImageView.titleLabelfor the label with the bold font.descriptionLabelfor the label below.audienceLabelfor the label in the NSBox.
With the outlets in place, add the implementation to show the product detail. Add the following code to DetailViewController class implementation:
// 1
var selectedProduct: Product? {
  didSet {
    updateUI()
  }
}
// 2
override func viewWillAppear() {
  updateUI()
}
// 3
private func updateUI() {
  if viewLoaded {
    if let product = selectedProduct {
      productImageView.image = product.image
      titleLabel.stringValue = product.title
      descriptionLabel.stringValue = product.descriptionText
      audienceLabel.stringValue = product.audience
    }
  }
}
You’re probably familiar with this code already, because it’s very similar to the Overview view controller implementation. This code:
- Defines a
selectedProductproperty and updates the UI whenever it changes. - Forces a UI update whenever the view appears (when the detail view tab is selected).
- Sets the product information (using
updateUI) in the labels and image view using the appropriate outlets.
When the product selection changes, you need to change the selected product in the detail view controller so that it updates the UI. Open ViewController.swift and add a property to hold a reference to the the detail view controller. Just below the overviewViewController property, add the following:
private var detailViewController: DetailViewController!
Find valueChanged(_:) and add the following inside:
detailViewController.selectedProduct = selectedProduct
This updates the selected product property of the view controller when the pop-up selection changes.
The last change is inside prepareForSegue(_:, sender:). Find the comment //More later and replace with the following:
detailViewController = controller as! DetailViewController
detailViewController.selectedProduct = selectedProduct
This updates the selectedProduct when the detail view is embedded.
Build and run, and enjoy your finished application!
Image may be NSFW.
Clik here to view.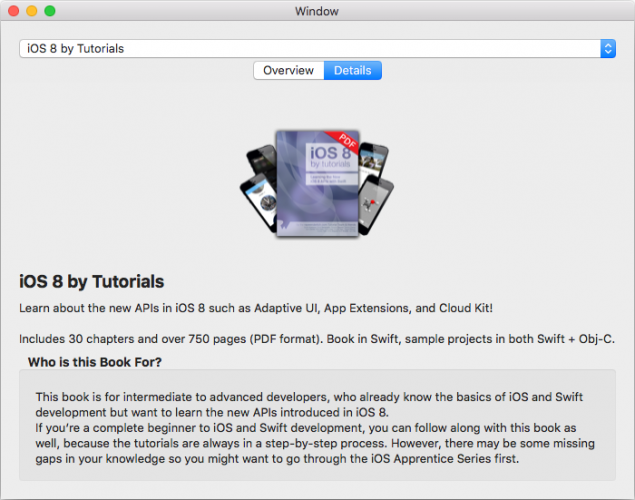
Where to Go From Here
You can download the final project here.
In this OS X view controller tutorial you’ve learned the following:
- What a view controller is and how it compares to a window controller
- Creating a custom view controller subclass
- How to connect elements in your view to a view controller
- How to manipulate the view from the view controller
- The lifecycle of a view controller, and how to hook into the different events
In addition to the functionality you’ve added to your custom view controller subclasses, there are many built-in subclasses provided for you. To see what built-in view controllers are available, take a look at the documentation.
If you’re not already read it, you should take a look at Gabriel Miro’s excellent tutorial on windows and window controllers.
View controllers are one of the most powerful and useful aspects of architecting an OS X app, and there’s plenty more to learn. However, you’re now equipped with the knowledge to go out there and start playing around building apps — which you should do now!
If you have any questions or comments, please join the forum discussion below.
The post OS X View Controllers Tutorial appeared first on Ray Wenderlich.